This is the tutorial I posted for the blog swap the other day but I also wanted to have it here. So in case you missed it, here it is...
Need to add some sass to your little lady's hair? A couple of these should do the trick...
Need to add some sass to your little lady's hair? A couple of these should do the trick...


Gather your supplies:
-2 small felt squares, one slightly bigger than the other (mine measured 2" squared and 1 3/4" squared)
-one piece of, 3/8" wide ribbon cut to 3 1/2'' long (grosgrain ribbon works well)
-some sort of "bling" for the middle of your flower (I used a rhinestone)
-double prong alligator clip (you can get these for pretty cheap at beauty supply stores, I found mine at Sally's I got 100 clips for about $5.00)
-candle
-lighter
-scissors
-hot glue gun
-hot glue
-non slip shelf liner, optional (I got mine at the dollar store)
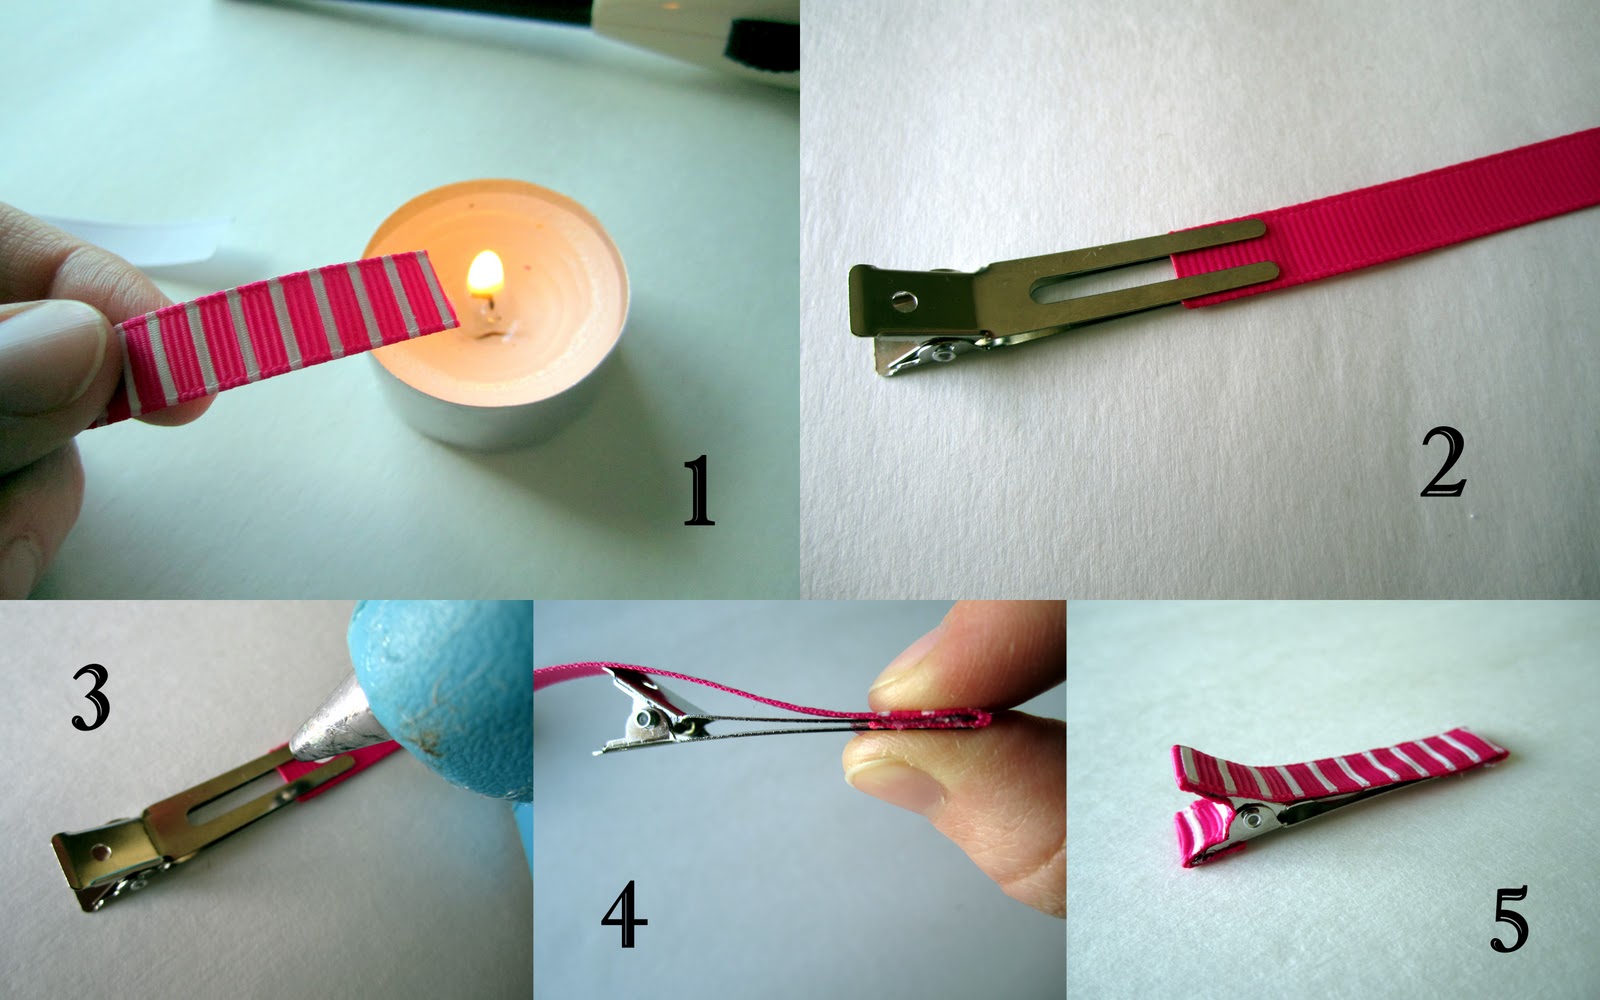
1-Heat seal your ribbon (to prevent fraying) by running the ends through the flame of your candle.
2-Sandwich your ribbon between the prongs of your clip, right side facing down.
3-Run a string of hot glue on top of the prong where the ribbon is.
4-Quickly fold the ribbon up and over the top prong. Pinch the ribbon together to smooth out the glue. Be careful, the glue is hot! Remove any excess glue.
5-Continue gluing on ribbon and smoothing it out as you go. Do just a little bit at a time until you reach the end of your ribbon.

6-Round the corners of your felt, forming two circles. It doesn't need to be perfect.
7-Cut a slit in the middle as shown in picture.
8-Cut a slit on the opossite side of your last one. Do the same to the other side. You will end up with 4 slits.
9-Round all the corners. This forms your petals.
10-Glue it all together. Make sure your smaller flower is on top.
11-Glue your flower onto the center of your clip and now you're done!....unless you want to add some "no slip grip" if you're making this for a little lady with fine hair.

12- cut a rectangle of your shelf liner slightly smaller than the base of your clip.
13-Glue on the shelf liner to the back of the top of your clip.
14-Now you are done! It can now grip onto the finest of baby hair, even a single piece of thread.
15-Repeat steps 1-14 and attach to some cute pigtails. I love those little whale spouts!

I also made a pair of these to match the "I Scream" onesie I made.

I will be linking to some of these parties. Check them out for more crafty ideas!


7 comments:
So cute! Love the idea of adding the grip to these. By Sally's you mean the beauty supply store? I'll have to swing by there. I've been looking for those clips everywhere.
The onesie is adorable.
Thanks Amnah. Yes, I meant Sally's, the beauty supply store. Sorry, I should've been more clear.
So cute! I love felt...it comes in so many fun colors and is so easy to work with!
Just stopping by to say that I'm your newest follower! I was drawn in by the caramel apples and the clips that you linked up at Tatortots and Jello, and I love your blog! A lot of the things you have posted are either things that are on my list of crafts to do, or things I've already done!
Oh I just love this and am going to make some this week for my daughter using your awesome tutorial! So fun! Thanks for sharing and I love your blog!
Thanks for all your nice comments. They are super easy and very addicting to make. Once you buy a pack of 100 clips, then you feel the need to make 100 clips! I'm sure you will be seeing a lot more different versions in the future!
Holy cow kelli, you are so busy. :) I love the dollhouse and I'm so tempted to make one for ayda for christmas. So much cute stuff! I should hire you to make me some decorations..... I miss you!
Post a Comment