Showing posts with label Accessories. Show all posts

Tuesday, March 1, 2011

Button Earrings

Sorry I've been M.I.A. lately.  I had a baby with double ear infections and a screaming hot fever that wouldn't go away.   Once she was better, we went off to play for the week up north to see my family.  Don't worry though.  Whenever the girls in the family get together you know there is some crafting going on so I'll show you what we were up to.

Jo-Ann's had all there buttons buy one get one free plus 10% off your purchase so I snatched some up to make some button earrings for super cheap.  I saw the idea at Trey and Lucy.  This has to be the easiest "craft" ever!  I think it took less than 2 minutes to do the whole thing so I don't know how much that counts as being "crafty".

I just took my wire/metal cutters  (I don't even know what the tool is called but at least I know how to use it!) and snapped off the back of the buttons and glued the button with some E6000 to earring posts.  You can also use hot glue I was just being impatient and didn't want to bother waiting for the glue to heat up.

And there you go!  Here is my "modeling" pose for you and in case you are wondering, yes my skin is that white all year round! ;0)  I also bought some huge buttons to make some rings but haven't put them together yet.  I'll have to show you some time.

I'll be linking to some of these places check them out for more fun ideas.

Thursday, December 9, 2010

Christmas Braided Rosette Tutorial

 I actually made this a few months ago but I decided it screamed Christmas to me and so I saved it for now.  So in case you were wondering...no, I didn't make McKinley sit outside in capris and a t-shirt in the middle of December! ;0)

Supplies:
-knit fabric
-felt scraps
-3/8" ribbon
-alligator clip
-pearls or other embellishments (optional)
-hot glue gun

 1-Take 3 strips of knit fabric about 1/2" wide and however long you'd like the longer it is the bigger the rosette (I guess that's obvious).  For my fabric I used an XXXL shirt I got at Walmart on clearance for $1.00....score!  It's a great way to get fabric for cheap!
2-Stretch the fabric so the ends curl up.  Tie it in a knot at the end.
3-Braid it together and tie a knot on the end.
4-Cut off the unbraided ends close to the knot.  Take a small square of felt put a large dot of hot glue.  Quickly, coil up the braid and stick it right onto the hot glue.
 5-Keep winding the fabric around, gluing as you go.
6-When you near the end of your braid, trim the felt to right up against the rosette.
7-Hot glue the last bit of braid.
8-Glue the end to the back of your rosette.
 9-This pictures just shows that I obviously just took to many unessecary pictures for such a simple project!
10-If you want a "leaf" glue together the ends of a small piece of ribbon.
11-Glue to the back of your rosette.  Glue a small circle of felt on top of that to cover up your mess.
12-Attach to to a covered alligator clip (see my other tutorial HERE for tips) and you can be done if you'd like or...
 add some pearls!
Now all you need to do is attach it to a cute little lady!

If you want one but don't want to make one yourself, you can purchase one in my shop, just look to your right. I will be linking to a few of these places.  Check them out for more fun ideas.

Friday, October 22, 2010

Felt Flower Clips Tutorial

This is the tutorial I posted for the blog swap the other day but I also wanted to have it here.  So in case you missed it, here it is...

Need to add some sass to your little lady's hair?  A couple of these should do the trick...


Gather your supplies:
-2 small felt squares, one slightly bigger than the other (mine measured 2" squared and 1 3/4" squared)
-one piece of, 3/8" wide ribbon cut to 3 1/2'' long (grosgrain ribbon works well)
-some sort of "bling" for the middle of your flower (I used a rhinestone)
-double prong alligator clip (you can get these for pretty cheap at beauty supply stores, I found mine at Sally's I got 100 clips for about $5.00)
-candle
-lighter
-scissors
-hot glue gun
-hot glue
-non slip shelf liner, optional (I got mine at the dollar store)


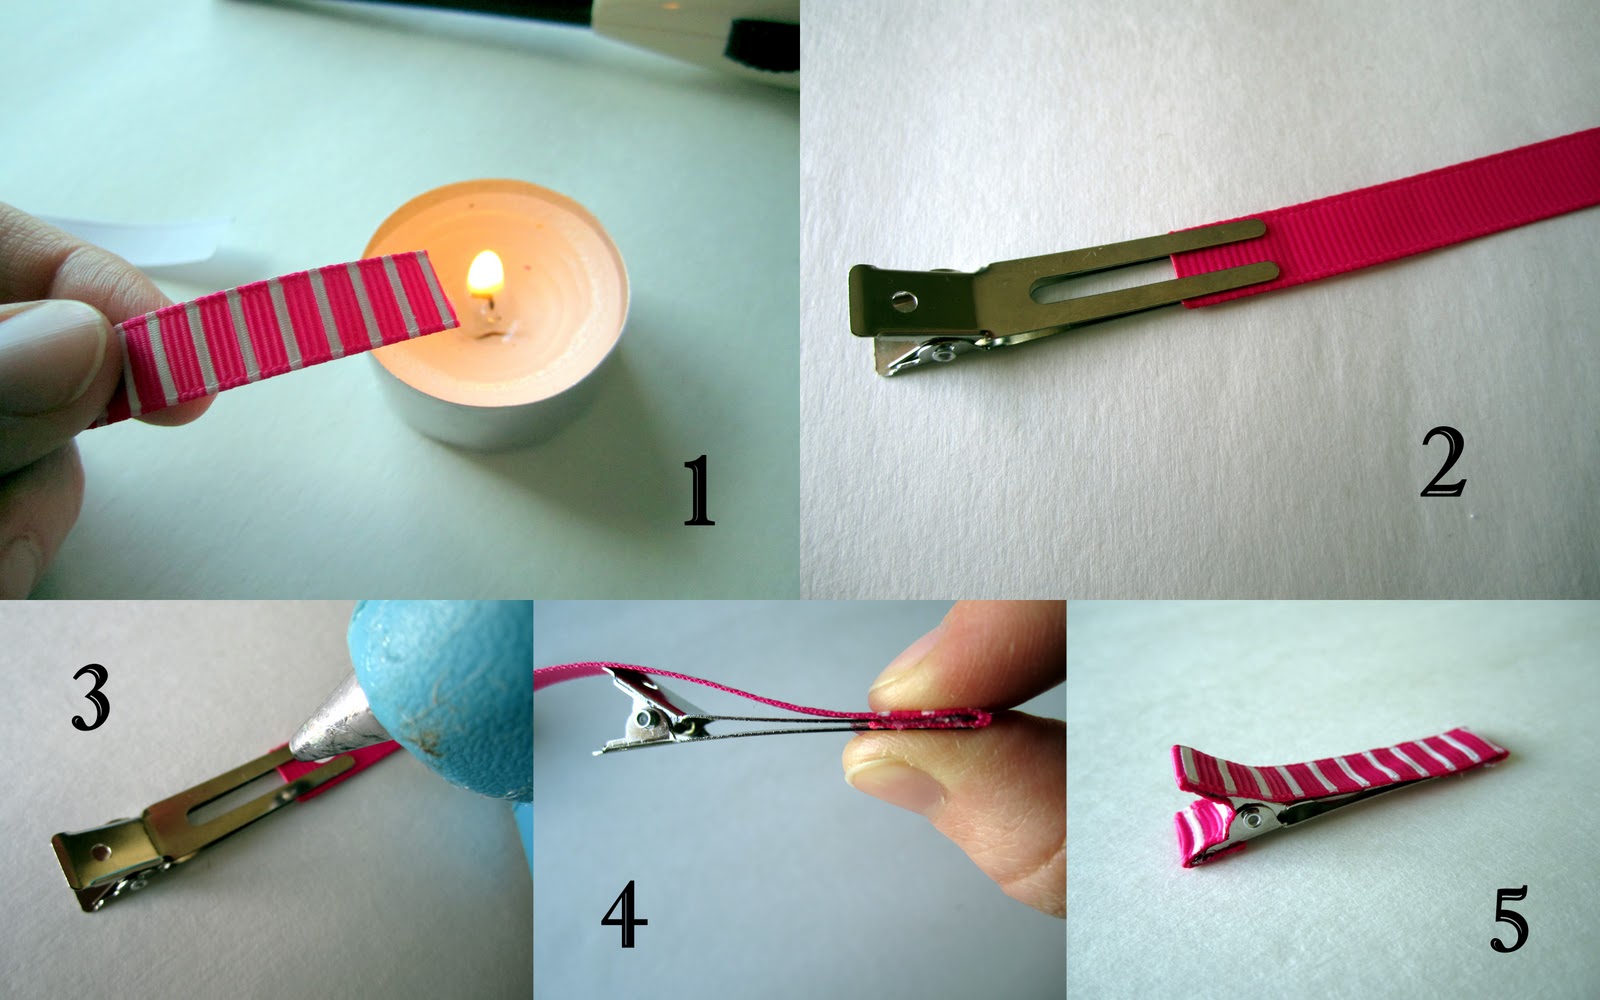
1-Heat seal your ribbon (to prevent fraying) by running the ends through the flame of your candle.
2-Sandwich your ribbon between the prongs of your clip, right side facing down.
3-Run a string of hot glue on top of the prong where the ribbon is.
4-Quickly fold the ribbon up and over the top prong.  Pinch the ribbon together to smooth out the glue.  Be careful, the glue is hot!  Remove any excess glue.
5-Continue gluing on ribbon and smoothing it out as you go.  Do just a little bit at a time until you reach the end of your ribbon.


6-Round the corners of your felt, forming two circles.  It doesn't need to be perfect.
7-Cut a slit in the middle as shown in picture.
8-Cut a slit on the opossite side of your last one.  Do the same to the other side.  You will end up with 4 slits.
9-Round all the corners.  This forms your petals.
10-Glue it all together.  Make sure your smaller flower is on top.
11-Glue your flower onto the center of your clip and now you're done!....unless you want to add some "no slip grip" if you're making this for a little lady with fine hair.


12- cut a rectangle of your shelf liner slightly smaller than the base of your clip.
13-Glue on the shelf liner to the back of the top of your clip.
14-Now you are done!  It can now grip onto the finest of baby hair, even a single piece of thread.
15-Repeat steps 1-14 and attach to some cute pigtails.  I love those little whale spouts!


I also made a pair of these to match the "I Scream" onesie I made.


I will be linking to some of these parties.  Check them out for more crafty ideas!

Tuesday, September 14, 2010

Funky Chunky Necklace

I made another funky necklace last night.  Remember this one?  I thought I needed one in red too.  Just like my last necklace I made, I got the idea from this bracelet tutorial from A Lemon Squeezy Home but did some tweaking to it and turned it into a necklace instead just by adding some length to it and a long piece of ribbon to tie around my neck.  I know it's not for everyone but sometimes you have to go big or go home.  Right? ;)
I couldn't decide if it should go with a yellow shirt or a gray shirt so I did both.
Then my little helper insisted she get in on the shot.  That big blob there would be her pointing to the camera.

Monday, September 13, 2010

Glass Tile Pendants


I made these glass tile pendants last year for my sister-in-law for Christmas and some for myself.  My mom and sister are young women leaders for their wards in our church and they had their girls make these as well at an activity, because they are super easy and make a great group activity!  They also make very inexpensive gifts.  I think they ended up costing around 50 cents each, not including the chain.  I got my supplies from Etsy.


The only bad part is you need to buy them in bulk to get them cheap.  Hence, the very unnecessary large amounts of them....


This doesn't even include them all.  I guess I must have "needed" one in every color! ;)  Here is a tutorial from Trey and Lucy so you can make them too.  The Diamond Glaze they use can be expensive if you only plan on making a few and not a million like I did.  My mom used good ol' mod podge with her girls and it seemed to work just fine.  The mod podge is probably not quite as clear and water resistant as the glaze but it's a whole lot cheaper!

P.S. Thanks for the new people "following" me, it's nice to have you and to know that I am not talking to myself! ;)
Related Posts with Thumbnails
 
Related Posts with Thumbnails