Tuesday, January 25, 2011

Pretty Pleated Pillow


I kind of have an obsession with pillows. Ironically, the pillows on my couch are p-i-t-i-f-u-l! I think they are about an inch thick because they've lost all their stuffing! I am determined to change that, so to start I made this pleated pillow. I want to have a mixture of both patterned and solid pillows but I didn't want the solid pillows to be boring so I have been on the look out for some pillow inspiration. I found some from Cottage Instincts when I saw this pillow hanging out in the background on this couch...

Image Source, Cottage Instincts


I attempted to copy hers which I'm sure you'd think is simple because there is not much to them but I am definitely what you would call a beginner sewer. As in, this is the first pleat I've ever sewn.  If I knew what I was doing I would've done a tutorial, but I didn't.  The things I will change the next time is add extra length to the pleated panel of fabric.  I only added an extra 6 inches for three pleats which was not near enough, but you live and learn right?

The sad news for this pillow is that it probably won't even be used. I am trying to use more bold colors in my living room and I don't think this fits into that category, but well see. I bought the fabric at Home Fabrics in Salt Lake, which in my opinion is the best place to get cheap but quality home decor weight fabric, they also have one in Las Vegas. I have to go every time I visit my family.  The fabric was on clearance for only a $1.00 a yard and was wide enough to get 2 pillows out of so you can't beat 50 cents!

I am linking this to a few of these places and also to the bloggers pillow party over at Stiched in Color.
Blogger's Pillow Party
Go check it out for some great inspiration.  I especially loved this one.  Definitely want to put that on my to-do list.

Kitchen Cabinets and Faux Granite Q and A

Wow!  I am blown away by all your nice comments on my parent's kitchen makeover.  I've received quite a few emails and questions about it so I thought I'd putt all the answers all in one post for everyone to find in case other people had the same questions.  I'm warning you though, this is a loooong post.

I have to tell you up front I, nor my parents are experts on doing this stuff so please before you try any of this do some research.  This is just how SHE did it.  Not necessarily the perfect way to do it! ;0)  You can find a ton of information on both painting your cabinets and faux granite painting by googling, googling, and more googling!  I know there are also helpful youtube videos as well.
 Now let me tell you how she did her cabinets.  The biggest pain of the whole process was waiting for the oil-based stain to dry but she's glad she used oil-based because a lot of neighbors used a regular wall paint on theirs and they are chipping much easier and not holding up as well.  Remember oil-based smells very strong.  It's nice to do it during the summer when windows can be opened and the sun can help things dry faster!!

The first thing she did was remove all the doors and drawer faces and took off all the hardware.  Next she washed all the cabinetry with a TSP (Trisodium Phosphate) solution. You can find it at Home Improvement stores.  This removes all the grease which is really what you are trying to do...especially around the stove. 

Next she taped off all the cabinets with painters tape and filled in all the holes from the drawer pulls with a wood filler and allowed it to dry a little.
 
Next she lightly sanded everything and used a liquid sander deglosser like this one.  She applied it with a sponge.  Than she washed and dried them off.  By the time she got to the last few cabinets, she was very lazy with the glossing and the sanding and they probably didn't get much if anything!  The beauty of gel stain is that it will stick to a shiny surface.  She doesn't know if the cabinets that got less attention will hold up as well but the stain seemed to apply the same way and they look the same and so far don't seem any different from the ones she suffered more over with all the extra prepping.

Next she rolled on a mixture of oil based gel stains like this one.  She thinks it was Min-Wax brand she used and it was a mixture of the two darkest brown colors she could get, one had a red tint to it. She used an ice cream bucket with a lid to combine the two cans of gel stain in.  She used the foam rollers you can find at the dollar store (sometimes) to roll on so that way she didn't feel bad about tossing it.  I know it's not the "green" thing to do but have you had to clean up oil based paint?  It's a pain! 

The gel paint is a bit tricky to use.  if you roll it too much, you pick up the coat of paint you already rolled on.  She used a foam brush to dab on little spots that were bare.  Even though it is a stain she didn't wipe it off like you usually do with stains.  She left it on exactly as it rolled on.  She wanted to see some of the wood grain but not enough to look like she had used a stain.  She wanted it somewhere in between the look of a stain versus the look of painted wood.  Because she left it on thick it took 24 hours at least to dry. She applied an average of two coats just to get the color even.  After everything was dry, she took a small can of ebony or black regular oil stain.  She scooped out some of her mixture of gel stains into another small plastic throw-away container  with a lid (maybe a cup or two???)  She added a little bit of black oil liquid stain at a time to darken it to almost black.  With piece of old T-shirt she wiped this mixture on, mostly in the recessed areas like antiquing to give it a little more depth and shadow there.  Also along the edges.  She found that if she got too much black, she could wipe it off or if it was still too black, she would go back to the original gel mixture and add more of that.  She did this repeatedly until she got just the right depth of color and shading. 

 After everything was dry, she wiped thin coats of oil based Polyurethane mixed with some thinner (about 4:1 mixture maybe).  She didn't like using the full strength Polyurethane because it was too shiny, even though she got the satin sheen.  She found that wiping it off eliminated stroke marks as well.  She had to do 3 to 4 coats or more but it went really fast.  Some probably had more coats in an attempt to equal out the shine.  Next, my Dad rehung all the cabinetry and added all the hardware.

A warning though, she has found little dings here and there on her cabinets but you can just do a little touch up.  That's why she keeps small containers of both the original gel mixture and the blackened mixture in a kitchen drawer.  Every few weeks she does touch-ups here and there.  She now has found an even easier way to do touch-ups.  Because her cabinets are a mixture of colors including the black she can get away with using a black sharpie for touch ups!  Yes, that's right, a sharpie!  She just dabs it on the nicked spot and then blends it with her finger.  If it were a large area than she'd use the original paint but usually it's just tiny nicks.  She probably doesn't have as many dings as someone with small children who'd be driving trucks and swinging toys into the cabinetry.

Next up The Faux Granite
 
The box store paint employees told my mom that faux painting counters could not be done, especially with acrylic craft paint and not to bother trying it.   There are even some kits you can purchase  with "special" paint but it's really all the same technique.  She decided it was risky to try, but if it didn't work out she was willing to replace her counter tops and cabinet doors anyway so nothing would be lost but time and the cost of supplies if it didn't work out.  It's been a few months now and so far no regrets at all!!!

See this post to get all the steps for painting faux granite.  I would suggest practicing on something.  My mom practiced everything on her laundry room cabinets and counter and that is how she discovered she didn't like using the oil-based polyurethane because they went very yellow. If you don't have a laundry room to practice in, maybe you have a small bathroom counter and cabinets.  She used wipe on water-based polyacrylic and as I said before she did about 10 coats to protect it.  It was a definite pain, trying to get the foam "brush" strokes out and she finally had to give up and live with it in a few areas.  Another thing I forgot to mention is, don't ever put anything hot directly on your counters.  It will leave marks.  She always makes sure to use a hot pad or trivet.  She had to do that with the old counter to avoid marks so it's nothing new.  She did end up with one "ring" where someone put a hot pan directly onto the counter.  She still hasn't had any regrets and is enjoying a completely different look for not a lot of money.

There.  Did you make it?  I think I've answered all the questions I received but if I missed any then you can leave them in the comments below and if you have any helpful links you can also share those as well.  Hopefully this helps someone.  Good luck!

Tuesday, January 18, 2011

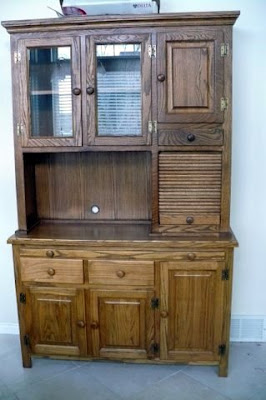
Hutch Makeover

Here is the other part of my mom's kitchen redo that I showed you yesterday.  This wall is on the other side of the kitchen that you didn't see.

Here is the BEFORE...                                                    and here is the AFTER...         

The power of paint amazes me every time!  I think it looks so much more modern. She painted the wall a rusty red with a satin finish and gave the hutch a makeover as well. 

She used tintable primer instead of paint like what she used on her counter tops. Then she used some brown antiquing gel over the whole thing (It was Delta brand and it's just the cheap stuff found at craft stores in the little bottles).  To apply the antiquing gel she wiped some on with a sponge and then wiped it off until you have the coverage you want.

She replaced the hardware with some of the same drawer pulls as her cabinets.  Like before, they used to be brass.  She spray painted them a flat black color and then added some of the same brown antiquing gel on top that she used for the hutch.  This gave it the look of oil rubbed bronze.  She decided to leave off one of the doors to give the hutch  a different look and then she put in some wicker baskets that she found and spray painted brown.  I don't think I have ever have thought about spray painting baskets but why couldn't you?  They look great!

There you have it.  Didn't she do a great job?  I will be linking to some of these places.

Monday, January 17, 2011

$250 Kitchen Makeover with $20 Granite Countertops...Faux Real!

I'm finally showing you guys...  Here is my mom's $250.00 kitchen makeover!  It was actually more like $200 but I'm sure there are some expenses in there we forgot so we'll say $250.  Once again I couldn't find a good before picture so you'll just get to see my cute nephews again for the before shot.  They are obviously dying Easter eggs in the picture...so forgive the mess and the semi crossed eyes. 

The before.  Notice the yellow oak cabinets, brass drawer pulls and stark white counters.
The after...
Ta da!  Love it!  It was hard to get a good straight on picture at this time of the day with all of those windows. I  can't believe what a difference $250 and some elbow grease can make.  

Here's a few more angles...
  And some more (this picture was taken on a different day and won't enlarge for some reason)...
 and another...

Nice huh?  Wanna know how she did it?
First up were the cabinets.  She hated the yellow oak that she had and wanted something dark which her kitchen certainly can handle with how much natural light there is.  All of the main living area is entirely surrounded by stacks of windows.  I love it!

She used a blackish/redish/brown mixture of oil based, gel stain on the cabinets.  Sorry, I don't know what color specifically because she mixed them herself and doesn't have the original containers but any oil based gel stain should do.  I think she got it perfect.  She didn't want them to look painted she wanted to still be able to see the wood grain running through.  Which she definitely achieved.  Next she changed out all the hardware which that alone can cost more than $250.00 for a kitchen this size, but she hit the jack pot.  The chunky drawer pulls were found at Lowe's for 50 cents each.  They were originally an ugly brass color and she just spray painted over them with a hammered nickel color by Rustoleum and the round knobs were found on KSL classifieds for cheap.  Another good place to look for inexpensive drawer pulls is ebay.

I'm sure you figured out that the countertops are faux granite.  I didn't even know such a thing existed until my mom told me she was going to paint her countertops and I thought she was crazy!  They look really good and they are a whole lot cheaper than the real thing.   She said she had nothing to lose by painting the counter tops because that's how much she didn't like them before.  You would be shocked by how easy and quick they were to do.
Here's a before of the countertop.  Just plain white...
and the after...
$20.00 Granite....Faux Real people ( haha, I am so clever...just kidding ;0)

I helped for about 5 minutes on this project so I'll give you my observations of how to do it if you'd like.
What you need...
water based, tintable primer
acrylic paint in a variety of shades (I think she actually used 6 different colors)
polyacrilic 
a sea sponge
a cheap paintbrush (you know the kind that has like 10 bristles and comes in kids paint by number books)
Painters tape
Paint roller (the ones you find at the dollar store work great, the kind without all the fur)

 Lightly sand the counter top.  Wash and dry.  Tape off the countertop.  Roll on your tintable primer.  This is your base coat.  Let it dry.
 Get your sea sponge wet and start dabbing into your first acrylic paint and start going at it....
There is no rhyme or reason...really.  Just dab the sea sponge all over.  I was nervous to mess up her counter and to prove that I couldn't mess it up my mom continued to paint when the power went out!  Luckily, it was only out for a couple minutes.  Every now and again she'd grab the cheap paint brush (the bristles were all bent and it was dry) and she'd dab some paint on with that, just to give it some straight edge looking blobs.  

She didn't really let the paint dry much between coats.  She would work from one end to the other and once she worked her way to one side, she would start on with another color immediately and repeated that with all the colors.  After she did a layer of each color she would go back and add more of whatever color she wanted to emphasize.  She then let it all dry and the last step was to apply lots and lots of Polyacrylic to protect it. You don't want to use Polyurethane because it will turn yellow.  I think she applied like 10 coats of polyacrylic.  I know that sounds like it would take forever, but it goes on very fast and drys really fast I don't think she spent more than a few hours combined on all the coutertops (not including drying time of course).  Those cabinets however are another story.  I went to visit for the weekend so we could paint her cabinets and get it all done in a weekend...that was a joke!  Do you see how many cabinets there are?  That was definitely not a weekend project unless you have a small army to help you.

You do need to let the paint cure.  She didn't use the counters for a while.  It has now been about 2 months and they have held up perfect!  No chips or scratching.  Not a bad transformation for the money?  Next up she wants to find a new chair for the desk to redo.  She's been on the hunt but hasn't found the perfect one yet.  She also found a nice huge faucet she still needs to install and eventually she'd like a stainless steel fridge, anyone want to donate?  Just kidding.  I'll be linking to some of these places.  Come back tomorrow and I'll show you a hutch she transformed as well!

Sunday, January 16, 2011

More Sassy Pants and Headbands

Here are a few things I 've been making lately...when McKinley let's me ;0)! I don't know how so many bloggers out there both make something everyday and blog about it everyday, that certainly isn't me!  I don't think I'd ever get to sleep if I did that.

These aren't anything new, just different fabric combinations.  I hope you like them because I loooove them!  They are all available in my shop.


And more headbands or they can be clips or whatever you want, in all sorts of colors.


Ok, enough of that.  I know those of you who are following my blog are most likely people like me who like to make stuff yourself instead of buying it, but I just thought I would share what I made because I love how they turned out!  Those pants with the pink cuffs are my favorite!

Oh and sorry about all the random "published for a second"  posts yesterday that those of you following me may have seen.  I didn't mean to press publish, let alone press publish multiple times!  I will show you that kitchen makeover tomorrow or Tuesday, so as Jimmy Fallon says, "Come on back!"   

Thursday, January 13, 2011

Mmmm...Chililicious

Before everyone breaks their New Year's Resolution to eat healthier (or have you already?) I thought I'd supply you with a good and healthy recipe.  Jason's Chililicious by Cathy Zieskle should do the trick.  I used to not like beans but now I do and they're so good for you, so you better learn to like them too!  Just kidding.  Get the recipe here.

The only thing I do different is use more chicken broth and I haven't tried adding the Coriander it calls for because when I went to the store to get some it was like $6.00 for a tiny, little bottle so I couldn't bring myself to buying it (yes, I'm cheap in case you didn't know) and I still liked it, so I kind of forgot about it.  Make sure you have some fresh limes to squeeze on top.  That's my favorite!

Tuesday, January 11, 2011

Doll Cradle Blanket

 Here is yet another thing made by my crafty mother.  She made it for my niece.  She found this little cradle on KSL.  Isn't it cute?  She made the blanket inside.  It is made from scraps from a quilt that my sister-in-law is making for her girls so the cradle will match their room.  I'll have to show that to you too.  I love all the vibrant colors.
My mom makes the quilt a "cheater" way so you don't have to cut all those tiny squares.  I'll have to share with you how she does it sometime. 

One of these days you'll see something made by me.  I've made some stuff but haven't gotten around to taking pictures.  Kinley has started only taking one nap a day and it's a short one, so there isn't as much time for crafting as I had before.   Instead I've been chasing a toddler around.  She can get into trouble quick!  Last week I was drying my hair while she played and when I came out of the bathroom I found her with my makeup and she had put it all over her entire face!  She was very proud of herself.  It was too cute!  If only I thought to take a picture!

Wednesday, January 5, 2011

Jean Quilt

My sister made this quilt for my brother and his family for Christmas.  I love these quilts!  They're made up of everybody's old jeans and nice comfy flanel.  Our family had one growing up that my Aunt had made.  It was the most fought over quilt when we would go camping or sleep out on the trampoline. They are nice and heavy and warm.  I love them.  My sister filled all the pockets with toys and surprises for their girls.  Another fun thing she did was give them the twelve days of Christmas books.  The kids get to unwrap a new Christmas book each night to read.  In our family we rotate which sibling we get gifts for and next year my sister has my family so I'm sending out a big fat hint to my sister right now and saying that I love that gift!  Was that a big enough hint?

Tuesday, January 4, 2011

McKinley's Rockin Rocking Chair & Other Cute Stuff

 My parents gave this to McKinley for Christmas.  I love it!  My mom got a plain wood rocking chair at Michael's for 60% off and painted it white to match the rest of her nursery and made that adorable flower petal cushion to go along with her garden room.
 I love it.  McKinley also got this cute pillow made by my Grandma...
 It says,"Like star dust glistening on fairies wings little girls are made of magical things".  The back has this fun, shimmery fabric.  The pillow fits perfectly on her chair.
Another fun touch my mom added to the chair is one of those tiny musical button things (I don't know what they're called), you know the kind that is put in stuffed animals.  She glued it under the arm rest so Kin has herself a secret music button.  She hasn't quite figured it out yet because the button is so small and kind of hidden but whenever she hears the music she does a little dance too it.
 Here she is modeling the Christmas pajamas I made her while she reads some sort of fascinating story.  I think she loves the new seat.  I wish you all could hear her jabber like crazy while she's "reading".  If only I knew what she was saying.

Matt's mom made Kin an adorable, squishable, bunny blanket.
 McKinley loves to hug it.  She thinks it's a baby and packs it around.
 Thanks for all the adorable gifts!  I'll be back tomorrow to show you some other good stuff!

Monday, January 3, 2011

I'm Back...and My Favorite Projects of 2010

I'm back!  I love when blogs do a favorite's post at the end of the year because I don't see every post that everyone does and I get to find a lot of fun projects that I didn't see before so I thought I'd share some of my favorites. 
 
 I love how McKinley's nursery turned out, it was technically done in 2009 but oh well!  I'm afraid I can't claim most of the work.  My little stinker, McKinley, was born super early so I didn't have a chance to do much before she surprised us with her unexpected early appearance, luckily my mom and sister came to the rescue (because you know I couldn't possibly live without having a cute nursery!) ;0)

I loved this ruffly skirt made from an old t-shirt...too bad kids grow so fast, this has been too small for a long time!
 
 These necklaces were quick, easy and cheap.  Just my kind of crafting!
What little girl doesn't love a doll to squeeze?
You can't have too many accessories...right?
I love my dollar store painted frame holding a flower from my wedding bouquet.
I loved learning how to shir on this little dress.  It made me shirrr crazy!
Easy and cute hair accessory organizer.
I had to throw in a recipe here.  This is a good one. I don't think I ever cared what my syrup tasted like until I had Buttermilk Syrup...yummy!  Believe me.  You are going to be sorely disappointed with your bottled stuff from this point forward.
 
Sweet little, I scream for Ice cream onesie and matching hair clips.
This project was one of the most fun.  I loved planning McKinley's first birthday party.  So fun!

Thank you to everyone who visits my crazy little blog!  My camera is fixed and I should be back in business again.  I ran out of time and only got around to making one handmade gift this year and didn't even get a picture of it since I didn't have a camera.  My family however, made some incredibly cute things that I'll have to share with you tomorrow.  I also have all the pictures I needed to show you of my mom's kitchen redo so you should see that soon.  I have a crafty to-do list a mile long and a garage full of junky furniture to redo so hopefully you'll stick around for the ride and maybe I'll actually get some stuff done!
Related Posts with Thumbnails
 
Related Posts with Thumbnails