Showing posts with label Recipes. Show all posts

Tuesday, February 8, 2011

Strawberry Spinach Salad with Toasted Almonds


This is the easiest salad ever!  It is also very delicious.  My husband even loves it even though he thinks it looks like one of those girlie salads made for girl parties like baby and bridal showers.  

You can make this as fancy as you'd like by adding in lots of extras like mandarin oranges, cheese, red onion, etc or keep it simple like I do.  Don't get me wrong, I looove all the fancy extras that people have in this type of salad but I don't love taking a half hour just to make a side salad for dinner!  If a recipe is simple it's certainly going to be made way more often at my house than one that I have to have lots of different ingredients and time to make it.  This recipe makes quite a bit and the leftovers don't save so only make how much you will eat that night.

Strawberry Spinach Salad with Toasted Almonds
1 bag Baby Spinach
2 lb Strawberries, sliced
1/3-1/2 cup Slivered Almonds, or Pecans
1-2 Tbsp. Sugar
Brianna's Homestyle Blush Wine Vinaigrette (or something similar, this is just what I use)


First you will toast the almonds or pecans.
  

1-Sprinkle the sugar into a small saucepan.  
2-Melt over medium heat while stirring constantly.  This happens really quick!  
3-Dump in your almonds or pecans and stir until coated and they smell "toasted".  I know I have zero scientific explanation of how to tell you when it's done but trust me you will smell the "toasted" smell.  It only takes a few seconds.  
4-Spread the almonds onto a piece of tinfoil or wax paper to cool for a couple minutes.  Once cool, break the pecans/almonds into chunks.  

Now all you have to do is toss everything together. Only mix in a little dressing at a time, just enough to coat everything.  A little goes a long way.  Serve immediately.

I'll be linking to a few of these places.  Check them out for more fun ideas.

Monday, February 7, 2011

Bountiful Baskets

I'm sure most of you have heard of Bountiful Baskets if you live in a state where it's offered (check out their site to see if it's available in your area) but I had to let everyone know about it in case you haven't or in case you forgot that it exists like I did. ;0)  It is ran by volunteers where you get a ton of fresh fruit and veggies for just $15.  Look what I got this week...

Yummy!  That is a ton of fresh produce for not much moo-la people.  They claim it saves you $35.00 if you were to buy all that produce at the grocery store which I think is stretching it a bit, but I am also cheap and don't usually buy things unless they're a good price.

This was the first time I've actually ordered.  I've been meaning to order for months but I never remember until it's too late.  I must say I am really happy with what I got.  My only complaint is that the entire bag of clementines I was given were too ripe but I'm sure that must not always be the case otherwise people would stop ordering and the program wouldn't still be around after all this time.

I think this will be a great way for my family to make sure we eat all our fruits and veggies because I hate wasting food and for that matter money too so I know we'll be motivated to get it all eaten!  I think I forget just how many fruits and vegetables we should be consuming.  For a 2000 calorie diet (according to the USDA), it is 2 1/2 cups vegetables and 2 cups fruit consumed each and every day!

  I think this will also be a nice way to plan out meals for the week.  You don't get to pick what you get so it's a surprise, but it's always 50% fruit and 50% vegetables.  Because of this I will be planning out my meals for the week on Saturday, the day you pick up your food.

I made a salad yesterday with the strawberries and spinach I got.  The best part is it was super simple!  I'll share the recipe with you tomorrow.
Bountiful Baskets only take orders on Mondays starting at noon until Tuesday at 10:00 pm so you have a few hours left if you want to order this week, so order quick!  Okay enough blabbing.  Until tomorrow.

Thursday, January 13, 2011

Mmmm...Chililicious

Before everyone breaks their New Year's Resolution to eat healthier (or have you already?) I thought I'd supply you with a good and healthy recipe.  Jason's Chililicious by Cathy Zieskle should do the trick.  I used to not like beans but now I do and they're so good for you, so you better learn to like them too!  Just kidding.  Get the recipe here.

The only thing I do different is use more chicken broth and I haven't tried adding the Coriander it calls for because when I went to the store to get some it was like $6.00 for a tiny, little bottle so I couldn't bring myself to buying it (yes, I'm cheap in case you didn't know) and I still liked it, so I kind of forgot about it.  Make sure you have some fresh limes to squeeze on top.  That's my favorite!

Thursday, December 16, 2010

A Question, Broken Camera, and Almond Roca Cookie Bars

I have a quick question.  Whenever I check my blog, 99.9% of the time I am on my laptop and the blog layout looks fine to me but last week I was on someone else's computer checking my blog and the layout was all over the place.  Everything on my sidebar was at the bottom of the page.  Is that how it looks to you?  If  so what web browser do you use?  I use Mozilla and I noticed the two other computers I was on use Internet Explorer.  I'm just curious if the type of web browser had anything to do with it.

 Another thing...I kind of feel like throwing a fit (is that allowed at 25?).  McKinley broke my camera!  I just bought it this summer.  It was my own fault for letting her play with it.  It was just a point and shoot camera, but it was a relatively nice point and shoot. Oh well, what's done is done.  I just don't feel like buying a third camera this year!

Onto the good stuff (with the terrible cell phone picture)....Almond Roca Cookie Bars!

My mom would make these around Christmas time and they were my favorite holiday treat.  The best part is they are easy to make!  I hope you like them.
Almond Roca Cookie Bars

1 c. butter, softened
1/2 c. white sugar
1/2 c. brown sugar
1 beaten egg yolk
2 c. flour
1 tsp. vanilla extract
chocolate chips
crushed almonds or walnuts

Cream together butter and sugars, mix everything else in but chocolate chips and nuts.  Press onto a greased cookie sheet (it will be a very thin layer and the dough consistency will be similar to play dough).  Bake at 350 degrees for 14-18 minutes or until golden.  Pull out of the oven and while it's still semi hot sprinkle on chocolate chips, it doesn't take that much (maybe 1/2 a bag).  As the chips melt spread them with a rubber spatula.  Sprinkle on nuts.  Let cool and cut into bars.  Enjoy!

Since I am busy and camera-less I think I am going to have to say Merry Christmas already!  I hope it's a good one for you.  See you after the holiday!  

Monday, December 6, 2010

Homemade Doughnuts

 I got this recipe from our family cookbook from my Aunt Carol.  It's their family tradition to make doughnuts on the first snowfall every year.  I have been wanting to create some family traditions of my own, so I thought I would adopt theirs and try it out. My sister tried them and loved them and I am so glad I did too, because they are delicious! 

These have a wonderful texture and I am guessing it comes from the potato flakes they have in them.  I know... potato flakes in doughnuts?  Strange, but good. 

Homemade Doughnuts

1/2 cup butter or margarine, melted
3/4 cup sugar
1 1/2 tsp. salt
1 cup instant potato flakes
2/3 cup instant powdered milk
2 1/2 cups hot water
1 Tbsp. Yeast
2 eggs, beaten
5 1/2-6 cups flour
cooking oil
In a large bowl, mix together butter, sugar, salt, potato flakes and powdered milk.  Pour in hot water.  Sprinkle in yeast over top and allow to get foamy.  Mix in beaten eggs.  Mix in flour (just enough to make a stiff dough).  Cover bowl with clean towel and let rise until doubled in size.  When it's double in size punch it down.  Let stand at room temperature for about 30 minutes.  Roll out dough onto a well floured surface to about 1/2 inch thick.  Cut out with doughnut cutter or do like I did and find things to use as a doughnut cutter like these....

  an ice cream sundae cup and a baby bottle for the hole!  It worked perfect!
 Let dough rise again uncovered.
Heat cooking oil to about 375 degrees.  I happen to have an electric deep skillet and it tells me exactly what temperature it is, but you can just use a pan on the stove.  You can test to see if the oil is hot enough by dropping in a small amount of dough.  It should float if it's ready and should brown in about 60 seconds. 
Only fry 2 doughnuts at a time.  Fry in hot oil until golden on both sides, turning once.  

I would suggest doing a test run with your first doughnut to make sure you are cooking them how you like them.  I didn't really do this at first and so the first few doughnuts weren't cooked to my liking as you can see below some of them were kind of burned!  If the oil is too hot they will be doughy on the inside, if the oil temperature is too low than they can be really greasy.

When the doughnut is golden on both sides, take it out with some tongs and allow the excess oil to drain back into the skillet.  Place on a plate with several layers of paper towels underneath to help soak up the extra oil. 
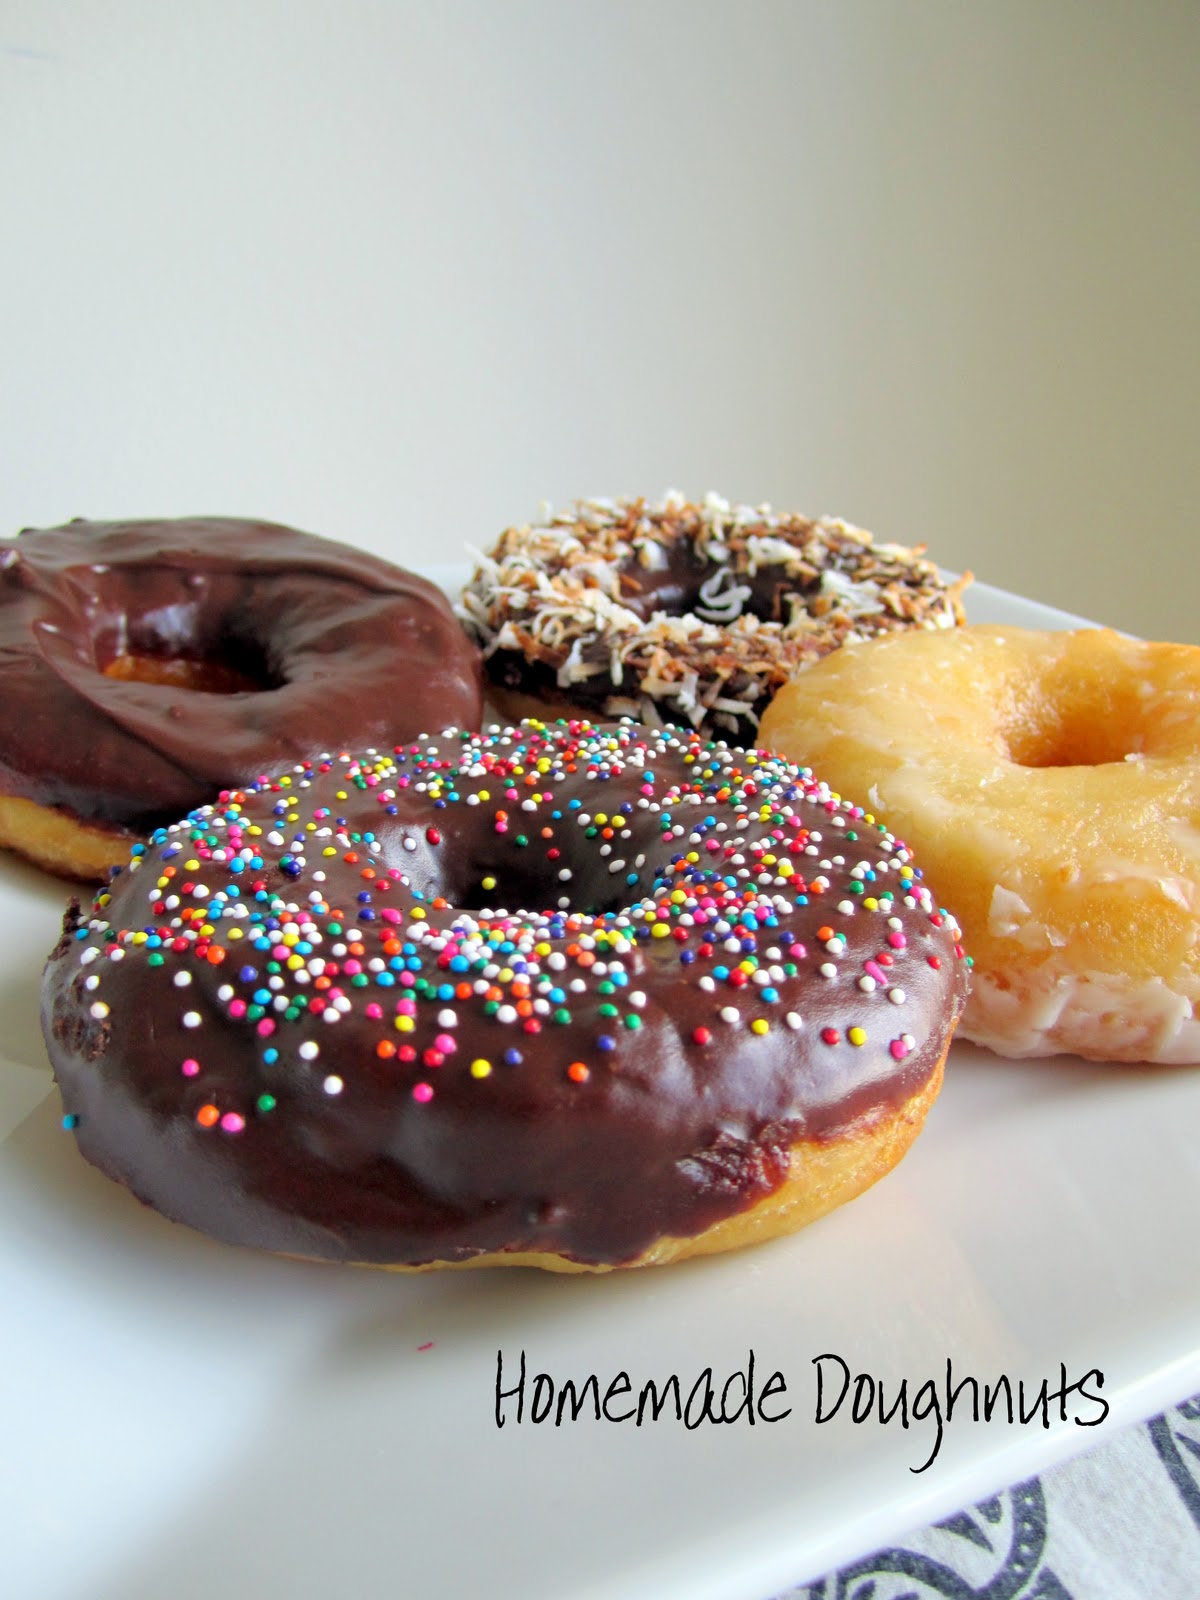
 Now for the fun part...icing the doughnuts.  You can frost them however you would like. We made a vanilla glaze, chocolate frosting, and also added some toasted coconut on some and sprinkles on the others...yummy!  The vanilla glaze recipe came from my Aunt and the chocolate frosting I think I found from allrecipes.com.  Both recipes couldn't be more simple.

Chocolate Satin Frosting

1 1/2 cups semi-sweet chocolate chips
2 Tbsp. light corn syrup
6 tbsp. buttter
1/2 tsp. vanilla.

I just put everything in a pyrex bowl (big enough to dunk the doughnuts in) and microwaved it in 30 second intervals, stirring in between until it was smooth...easy, easy, easy!

Vanilla Glaze
2 cups powdered sugar
1/4 cup water
1 tsp. vanilla

Mix together and pour over doughnuts.  Easy, easy, easy!

I'm all about making food look pretty if I can.  I know, I'm crazy and if you are crazy like me then make sure you just dunk your doughnuts into the chocolate frosting rather than using a knife to spread it on so you have that pretty smooth finish!  :)
 Once the chocolate cooled a bit I then dunked them into a pile of toasted coconut.  If you want sprinkles then add it while it's still warm so they'll stick.
 ooooh doughnuts....
 The vanilla glaze I just poured over top.  I am usually a chocolate girl but I think these were actually my favorite!  So simple but so good!
Aren't they pretty?  These would be fun to make them for the neighbors and take them over while they're still warm.  It's a good thing the first snowfall only happens once a year otherwise these things could be lethal.  I believe in all things in moderation....including doughnuts!

I'll be linking to some of these places.  Check them out for more fun ideas.

Tuesday, November 30, 2010

Cinnamon Roasted Almonds


I love these things! I think they are surprisingly delicious.  I make them to take to parties and things around this time of year and I think everyone passes by them thinking they are plain old almonds but once they taste them they are always surprised and love them!  Without fail someone asks for the recipe. They remind me of the nuts they sell in the mall around Christmas time.  I buy my almonds in bulk at Costco because I know we will be making lots of these at this time of the year.  The best part about them is they are quick to make.  My oven takes ten minutes to preheat and in that amount of time I can have these ready for the oven from start to finish!  The original recipe came from allrecipes.com but I made changes to just about everything it calls for and added more ingredients as well.  I hope you love them like I do!   

Cinnamon Roasted Almonds

1 egg white
1 tsp. vanilla
3 cups whole almonds
1/2 cup sugar
1/2 cup brown sugar
1 1/2 tsp. cinnamon
1/4 tsp. salt

 Preheat oven to 250 degrees.  Lightly beat egg white, add vanilla and beat until soft peaks form.  Add nuts and stir until well coated.  In a gallon size zip-lock bag shake together (you may want to seal the bag first :o) the sugar, brown sugar, cinnamon and salt until well mixed.  Add almonds and seal bag again and shake up until the almonds are all coated.  Spread almonds evenly onto a lightly greased cookie sheet (I cover my pan in tin foil first and then grease it so there is no clean up!) .  Bake for one hour stirring every fifteen minutes or so.

These make great neighbor gifts because they're something a little different.  I used plastic icing bags and filled them up and tied them off with a ribbon and they're the perfect size.  Not too much and not so little that you look cheap!  Ha ha.  Tell me if you try them because I know you will love them!

I will be linking up to some of these places.  Check them out for more fun ideas! 

Monday, November 22, 2010

Buttermilk Syrup

I got this recipe from my sister, who I believe got it from our cousin, who got it from her piano teacher,  Did you follow that?  This was once one of those "secret" recipes that the teacher wouldn't give out but she would make it for you if you wanted some.  The secret's out now!  This syrup is very rich and has a caramel taste to it, so much so, that I think it should be called caramel syrup instead of buttermilk syrup.  

I will warn you though, I would save this recipe for special occasions, otherwise you are going to be making it every weekend and end up packing on some major pounds!  I made them to go with these pancakes and it was good, almost too good.  I could have licked my plate clean!

Buttermilk Syrup

1/2 cup butter
1 cup sugar
1/2 cup buttermilk (see substitute below)
1/2 tsp. baking soda
1/2 tsp. salt
1 tsp. vanilla

In a medium sized saucepan (make sure it's not too small, the syrup expands when you add the baking soda) combine butter, sugar and buttermilk (if you don't have buttermilk, you can use a substitute by filling a measuring cup with a 1/2 tbsp lemon juice and fill to the 1/2 cup mark with regular milk).  Bring to a boil, stirring constantly.   Remove from heat and mix in vanilla, baking soda and salt.  For a thicker more caramel like syrup, before removing from heat, continue to boil until you get the desired consistency.  Serve and enjoy!
I will be linking to some of these places, go check them out!

Monday, October 25, 2010

Pumpkin Chocolate Chip Cookies


I realize there is no shortage of recipes for these floating around out there but I want to put all my favorite recipes on this blog.  I got this recipe from my sister-in-law, I think this may even be my mother-in-laws recipe, I'm not sure.  This recipe makes a ton.  It made about 7 dozen cookies.  I made them on Saturday night and they are already all gone!  No, I did not eat them all. ;o)  You can always cut the recipe down or you can just make them all and share them like I did.

I have had the kind of pumpkin cookies that you make just by mixing a spice cake mix and a can of pumpkin and I like those too but I like these ones a little better so I've stuck with this recipe when I need a lot of cookies like I did this weekend.


Pumpkin Chocolate Chip Cookies

Makes about 7 dozen

1 1/2 cups butter, softened
4 cups sugar
4 eggs
1 T. vanilla
1 large (29 oz) can pumpkin

7 1/2 cups flour
1 T. baking powder
1 T. baking soda
1 T. nutmeg
1 T. cinnamon
1 1/2 tsp. salt
 1 bag chocolate chips

In a large mixing bowl cream together butter, sugar, eggs, vanilla and pumpkin.  In a separate bowl mix together remaining dry ingredients (except chocolate chips).  Stir flour mixture into pumpkin mixture.  Fold in chocolate chips.  Spoon batter onto ungreased cookie sheet and bake at 350 degrees for 12 minutes. 

Thursday, October 21, 2010

White Chocolate and Cinnamon, Caramel Covered Apples


Back before I had McKinley, when I was working full time, I had a co-worker bring these in to share with everybody but I'm pretty sure I ate almost all of them because they are sooo good!  I couldn't stop myself, and I don't even usually like white chocolate!  This isn't an exact recipe but you can't really mess them up.

White Chocolate and Caramel Apples

-Apples, you can use any kind, but I think green Granny Smith apples would be perfect!
-12-15 caramels per apple.  The kind that is individually wrapped. Kraft sells them, or you can usually buy them by the pound this time of year.  You can also be an over achiever and make your own caramel :0)
-White chocolate (I used a bag of white chocolate chips which covered 5 apples)
-Cinnamon and Sugar, just enough to sprinkle over top
-1-2 Tbsp. water
-craft sticks (popsicle sticks)

1-Wash apples, remove core and stick in craft sticks.  Place apples aside in refrigerator.

2-Remove wrappers off the caramels and place them in a saucepan along with your water.  Melt caramels over medium low heat stirring constantly.  Melt caramels until they all come together but make sure it's not so hot that it's super runny (you want it to be slightly viscous still).

3-You can either dip your apples directly in the saucepan or you can transfer the caramel to a bowl that is tall and narrow so that you can cover the apples in one good dunk!  Dip your apple in the caramel, tip and swirl the apple until you get the desired coverage.  Lift the apple out of the caramel and let drip to remove any excess caramel to avoid a big pool at the bottom of your apple. If you want your apples to look "pretty" I would suggest melting more caramel and chocolate than you need so that you don't have to spoon the caramel on to have the last few apples covered. Place apples onto a lightly greased piece of wax paper on top of a plate and stick the apples in the refrigerator until cool and the caramel is set back up.

4-Melt the white chocolate.  I put the chocolate into a microwave safe bowl.  Set your microwave to half power and microwave for 2 minutes.  Take it out stir until smooth and then if needed microwave the chocolate for additional 30 second intervals until you get it to the right consistency.

5-Dip your apples into the chocolate using the same process as in step 3.  Sprinkle with cinnamon and sugar and place apples back into the refrigator until cold.

Enjoy.  You are going to love them!  Not to torture you but, I am eating one as I type and it is HEAVENLY!
I will be linking up to some of these parties.  Check them out!

Monday, October 4, 2010

Crepes

Sorry I've been m.i.a. lately.  I am doing a craft booth this Saturday at the New Harmony Apple Festival.  If you live near Southern Utah you should come take a peek.  I have been very busy.  After Saturday I should have some time to show you all the good stuff I've been making!  For now I thought I would share a quick recipe for these yummy things...

We had general conference for our church this past weekend and it's our family tradition to have a nice big breakfast and "juice bar" while we watch the conference on tv.  Crepes seem to be one of our favorite breakfast recipes.

Crepes are super thin pancakes that can be served with just about any toppings you can think of whether sweet or savory.  Some people use these just as you would use a wrap.  We go for the sweet variety for breakfast at our house. Some of my favorite combinations are strawberries with whipped cream and Nutella with sliced bananas.  I hope you like them!

Crepes
 1 1/2 c. milk
1 c. flour
2 T. sugar
1/4 tsp. baking powder
1/4 tsp. salt
1/2 tsp. vanilla
2 eggs
1 T. oil or melted butter

  Mix everything together.  Lightly oil a nonstick frying pan and bring to medium heat.  Drop in batter (around 1/4 cup at a time) tilt and turn the pan in a circular motion allowing the batter to swirl around and coat the bottom of the pan evenly.  Cook over medium heat until the edges curl.  Turn once and cook for another 10-15 seconds until golden underneath.

When making savory crepes omit the vanilla and sugar and try adding your favorite herbs to the mixture.

The batter can be stored in the refrigerator for up to 48 hours or you can cook them all at once and store them in the fridge for several days.  Crepes also store well in the freezer just place them in a resealable plastic bag and they will keep for up to 2 months.  When using frozen crepes allow them to thaw a little before attempting to peel them apart. 

Tuesday, September 28, 2010

Oooh chocolate, loads of chocolate!

Doesn't this look soooo good to all you chocolate lovers like myself? 
  Just imagine, decadent chocolate buttercream frosting sandwiched between two layers of moist devil's food cake completely covered by rich chocolate ganache and just to add the cherry on top, sprinkle on some toasted almonds!
 Sounds good right?  Too bad it looks better than it tastes!  I made it and I could've loved it if I hadn't burned it!  You know when you go to check a cake in the oven and it's not quite done so you think you will leave it in for just another 2 minutes?  Well, I remembered about those 2 minutes about 10 minutes too late.  I thought the cake could still be saved since it was going to be slathered in gooey, chocolatey goodness, but it didn't happen.  This was one crispy cake!  I don't know why I bothered finishing it.  I guess because decorating the cake is my favorite part of making it.  

This cake could be good.  It could be really good.  Just don't burn it.  Get the recipe here from Make it and love it.
 

Thursday, September 23, 2010

Broccoli Beef Stir Fry


Here is a simple recipe we had for dinner the other night.  We like this a lot and have it at least once a month, although I will make this disclaimer; this probably isn't a meal that's going to make you say, "WOW, that was the best meal ever!"  but it's still a keeper, otherwise I wouldn't put it on here.  Sheesh, doesn't that just make you want to drop everything and cook it up right now?  Obviously, I would make a terrible salesman. ;o)  

I think the key to making this meal good is don't over cook the meat and cut the meat super thin against/perpendicular to the grain of the meat.  If you look closely, there is a natural grain running through the meat, when you cut it against/perpendicular to the grain, it makes the meat more tender because your mouth has far fewer long fibers to chew through (sorry for all the gory details, I just always like to know the reason behind why you should do something a certain way).  Also, don't be afraid of the cayenne pepper if you don't like heat, it is subtle.  I hope you like it!

Broccoli Beef Stir Fry

1 lb lean steak, sliced thinly, against the grain
1 tbsp Cornstarch
1 1/3 c Water, divided
1 T Canola or Olive Oil
1 large head Broccoli, chopped
3/4 - 1 c Cashews

Marinade

3 tbsp Soy Sauce
3 tbsp Orange Juice
1 tbsp Apple Cider Vinegar
1 tbsp Brown Sugar
3 cloves Garlic, minced
1/4 tsp Red (Cayenne) Pepper Flakes (opt.)

Mix together marinade ingredients.  Add beef to marinade and let sit in refrigerator for at least 20 minutes (the longer the better).  Heat oil in a skillet on high.  Add beef reserving the marinade.  While meat is cooking, add cornstarch and 1/2 cup water to remaining marinade and set aside. Stir fry beef until brown, about 4 minutes.  Remove to a plate. Add 1/3 cup water to skillet.  Bring to a boil, scraping browned bits.  Add to marinade.  Stir fry broccoli 2 minutes, then add 1/2 cup water.  Stir fry 4 minutes.  Add marinade and bring to boil until thick.  Toss in meat and cashews.  Season with salt and pepper.  Serve over brown rice.

P.S. Thank you everyone who joined me yesterday.  I am happy you are here!
P.P.S.  If you don't want to gain weight, I highly suggest NOT buying the huge, monstrous plates I own.  Filling up your plate once at my house is probably equal to filling up a plate twice at your house! ;o)

Saturday, September 18, 2010

Fresh Salsa


I lied.  I said that I was going to be gone for the weekend but I just had to share one last thing with you before I left.  My husband and I made this salsa and it was so good!  Notice the chips in the picture are little crumbs, we already consumed most of the bag before I thought to take a picture. :)  This is perfect made with garden fresh tomatoes.  Yummy!

We planted a garden this year but some rotten little bug ate it all up before we got much out of it.  We gave up on it weeks ago and pulled most of it out.

the pitiful state of my garden... : (
  Matt calls them squash bugs but I don't know if that's what they are really called.  Does anyone know how to get rid of those things?  Lucky for us, Matt's family planted gardens so we're still able to get our hands on the good stuff.

Sorry there isn't an exact recipe here.  We just put it all together until it was perfect (if I do say so myself ;). These are ROUGH estimates.  Adjust them to your liking!

- 6-10 large tomatoes (I'm completely guessing on this one)
- 1 onion, chopped
-a couple cloves of garlic, pressed
-1 large jalapeno, membranes and seeds removed, finely diced
-1/2 -1 bunch cilantro, coarsely chopped
-juice of 1/2 -1 whole lime
-1/2 an (8oz) can tomato sauce
- 1-1 1/2 tsp? salt

Combine everything and enjoy.

I told you I only had rough (very rough) estimates, but with salsa you can't really go wrong.  Just remember, you can always add more of things but you can't take it back out so start adding ingredients in a little bit at a time until you get the flavor you are looking for. Also, the heat in jalapenos comes mainly from the seeds so if you can't take the heat get out of the kitchen!  Just kidding.  I meant to say if you can't take the heat get rid of the seeds.  Happy weekend!

Friday, September 17, 2010

Funny

I didn’t have potatoes,
so I substituted rice.
Didn’t have paprika,
so I used another spice.
I didn’t have tomato sauce,
so I used tomato paste.
A whole can not a half can -
I don’t believe in waste.
My friend gave me the recipe -
she said you couldn’t beat it.
There must be something wrong with her,
I couldn’t even eat it.

Source unknown

I got my Bachelor's degree in Family and Consumer Sciences with a Nutrition emphasis.  I know, I know, total "domestic goddess" degree.  Anyways, I took A LOT of classes involving food and we got this poem from one of my professors.  It reminded me of allrecipes.com, one of my favorite sites to find a good recipe quick!  On there you can rate a recipe and write a review and when I look at a review where the person said they substituted nearly everything the recipe called for with something else and then still give a bad rating I just have to laugh.  Maybe if they had followed the actual recipe they would've liked it! 

Speaking of recipes one of my cute friends, Mikelle, whom I shared many of those "domestic" classes with in high school and college started a recipe blog called Food, Fun, Life.  It is full of yummy, HEALTHY recipes.  She has a couple of cute kiddos of her own so you know the recipes are "kid tested and mother approved!".  She includes a ton of pictures and extra information.  Go check it out!   

P.S. Thanks to the new people joining me here.  It now takes 2 whole hands to count the number of followers, yipee! he he.  I have a ton more projects to share with you but for now it's my birthday and I am off to vacation for the weekend.   It'll be the first time I spend a night without McKinley.  My mom is taking her. Wish her luck.  Kin's a feisty little thing.  My mom's a brave woman! ;)
Related Posts with Thumbnails

Saturday, September 11, 2010

Black Bean Burgers with Cilantro Lime Dressing


I am in no way, shape or form a vegetarian.  I think I can count on two hands the number of times I have had a dinner that didn't include meat because my husband doesn't think it's dinner without it.  I on the other hand, don't mind meatless meals at all, as long as it has some form of protein. When I told Matt I was going to try this recipe he wasn't excited and before he came home from work that day he grabbed a candy bar so he could have something "good" for dinner.   I surprised him, he even liked it!

These are delicious, super healthy, full of flavor and very filling.  I think the filling aspect is lacking in some of the vegetarian meals I've tried.   The nice thing about this recipe is the whole thing can be made before hand and then when it's time to eat, just pull the burgers out of the fridge and cook them up! F.Y.I... I ended up using about 1/2-3/4 of the amount of bread crumbs it called for and my burgers ended up perfect.  I think if you used more they would end up way too dry.  I found this recipe through CuisineNie.  You can find it HERE.

Thursday, September 9, 2010

Fruit Dip


This is soooo good and so easy.  I got the original recipe from allrecipes.com but the version I use includes some changes I found in the comments.  Every last drop of this dip will get eaten up.  I promise.  I made this for the first time for McKinley's first birthday party and it was a hit.

Fruit Dip

1 (8 oz) pkg Light Strawberry Cream Cheese
1 (7 oz) jar Marshmallow creme
2 tbsp Orange juice
1 cup Cool Whip

Beat together strawberry cream cheese, marshmallow creme and orange juice. Fold in cool whip.  Eat it up!

Wednesday, September 1, 2010

Zucchini Brownies....Delicious!


This is by far the best way to eat zucchini in my opinion (notice I didn't say healthiest).  Don't be fooled by the name this certainly isn't a health food.  I love these things.  I think I could eat a whole pan myself.  They have a cake like texture but are super moist and much more dense than cake.  Ooooh and the chocolate frosting...yummy!

I don't remember where I got this recipe or I would tell you.  I've had it since I first got married and we had our first garden and we tried to come up with ways of using up our truckloads of zucchini without eating it for every meal and making zucchini bread every other night.

It seems like zucchini doubles in size overnight in the garden and when it's too big to eat alone this is my favorite thing to make with it.  When I have more of it than I can handle, I wash them up, shred it all but the seeds and put them into freezer bags in 2 cup portions so I can have this scrumptious treat year round.


Zucchini Brownies
1/2 cup vegetable oil
1 1/2 cups white sugar
2 tsp vanilla extract
2 cups flour
1/2 cup unsweetened cocoa powder
1 1/2 tsp baking soda
1 tsp salt
2 cups zucchini, shredded
1/2 cup chopped walnuts (optional)

Preheat oven to 350 degrees.  Mix oil, sugar and vanilla until well blended.  Combine flour, cocoa, baking soda and salt; stir into sugar mixture.  Fold in zucchini and walnuts.  Batter will be thick.  Spread evenly into greased 9"x13" pan.  Bake for 25-30 minutes.


Frosting
6 tbsp unsweetened cocoa powder
1/4 cup butter or margarine
2 cups powdered sugar
1/4 cup milk
1/2 tsp vanilla extract

Melt together cocoa and butter; set aside to cool.  In a medium bowl, blend powdered sugar, milk and vanilla.  Stir in cocoa mixture.  Spread evenly over cooled brownies before cutting into squares.  Enjoy!

Monday, August 30, 2010

McKinley's First Birthday Party

We had McKinley's birthday party on Saturday.  I tend to go overboard on things like this as you soon will see! I used one of my mom's die cuts that she uses for her invitations to make the petal wrap for McKinley's birthday invites.


Don't judge my lame rhyming skills!:) I know a phone call works just the same as the invitation, but where's the fun in that! We had a ridiculous amount of good food! I mean ridiculous.


There were yummy chocolate cupcakes with a vanilla cream filling and strawberry cream cheese icing. We also had lemon cream cupcakes with a lemon icing (not my favorite, they were a little dry and very heavy for a cupcake, I should've stuck with the good stuff...chocolate!). I told you I tend to go overboard. I was up till the wee hours of the morning Friday night cooking, and baking and cooking some more!


I also tried making a fondant cake for the first time. I made marshmallow fondant (tastes better than the store bought stuff in my personal opinion and it's cheaper) using this recipe and tutorial from Make it and Love it and it was pretty easy! Just melt a bag of marshmallows and knead in a bag of powdered sugar and some shortening and you're good to go!


I did however make the fondant a little on the dry side so it cracked a bit but it wasn't anything a few flowers and polkadots couldn't cover up!

I also had to try making some of the infamous hanging flower pom pom decorations you can find the tutorial here. I already had all the stuff to make them so yay for free decorations! I think they're cute enough to be in a little girls' room year round. I would put them in Kinley's room if they matched.


McKinley was excited to discover she got to eat an entire cake!


I think she liked it!

Cinnabon Pancakes...Yummy


So I've never been a fan of pancakes. I only would eat pancakes to be polite to whoever made them until I met THIS Cinnabon Pancake from the Pioneer Woman website.  I made these yesterday and promptly ate them up! They also have a recipe for an icing to go on top but I thought it was perfect with good ol' syrup. Yummy.

Go ahead, make them. You know you want to. Besides you probably won't even need to go the store to get anything. I bet you have everything sitting in your cupboard right now. Delicious, easy, and fast. Try it, all you pancake haters! You won't regret it (but your hips might, haha).


So while I ate these sugary cakes I gave McKinley a cold carrot (yeah, I know it's a choking hazard but I had my eyes on her) and she thought she was in heaven. If only I thought carrots were treats, maybe some day!
Related Posts with Thumbnails
 
Related Posts with Thumbnails